实验性 GraphQL

这篇博文是对最初介绍性文章《超音速亚原子 GraphQL》的后续,在这里我们将探讨更多功能,其中一些是实验性的,我们希望根据您的反馈最终将其纳入 MicroProfile GraphQL 规范!
我们将探讨以下内容
-
操作上下文 - 优化您的下游进程。
-
缓存 - 缓存您的端点。
-
异步 - 并发执行多个请求或数据源。
-
批量 - 解决 N+1 问题。
-
泛型支持。
-
事件和自定义执行。
-
转换和映射。
-
构建工具 - Maven 和 Gradle 支持。
所有源代码均在此处提供:github.com/phillip-kruger/graphql-experimental
操作上下文
Context 对象是一个实验性对象,可以注入到您的代码中的任何位置,位于 @GraphQLApi 的下游。
它位于 SmallRye GraphQL 的 api 模块中,旨在最终将其移至 MicroProfile GraphQL API。
示例
我们有一个 Person GraphQL 端点,它使用某个服务从存储它的任何地方获取人员信息。
端点
@GraphQLApi
public class PersonEndpoint {
@Inject
PersonService personService;
@Query
public List<Person> getPeople(){
return personService.getAllPeople();
}
@Query
public Person getPerson(int id){
return personService.getPerson(id);
}
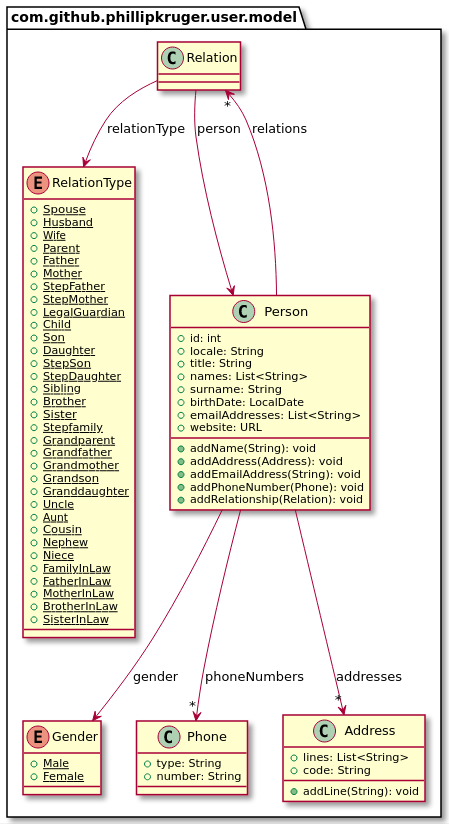
}Person 是一个基本的 POJO,可以有多个关系,而这些关系又包含 Person。因此,调用数据库获取一个人,可能会返回更多人,具体取决于关系的数量。在我们的例子中,Person 1 有一个 Spouse,即 Person 2。
现在假设 PersonService 调用数据库或某个其他存储来获取数据。我们现在可以注入 Context 对象来获取请求的详细信息,并优化我们的调用。
@ApplicationScoped
public class PersonService {

    @Inject Context context;

    public Person getPerson(int id){
        // Use context to get more information on the query
        // Let's print out the context here and see what we have
        System.out.println(context);

        // Get the person from the datastore here.
    }
}
让我们执行一个 Query 来获取 Person 1 的名字和姓氏。
{
  person(id:1){
    names
    surname
  }
}
那么,我们可以从 Context 中获得什么?
我们可以获得几样东西
executionId = 30337360
request = {"query":"{\n  person(id:1){\n    names\n    surname\n  }\n}","variables":null}
operationName = null
operationTypes = [Query]
parentTypeName = Query
variables = null
query = {
  person(id:1){
    names
    surname
  }
},
fieldName = person
selectedFields = ["names","surname"]
source = null
arguments = {id=1}
path = /person
我们可能想知道的是哪些字段被请求了,以便我们进行更好的数据库查询。
所以 fieldName(person)和 selectedFields(names,surname)是我们需要的。
更复杂的 GraphQL 请求将导致更复杂的 datasource 查询,例如,如果我们想知道关系,我们会这样做:
{
  person(id:1){
    names
    surname
    relations{
      relationType
      person{
        names
        surname
      }
    }
  }
}
这将为我们提供 Context selectedFields 中的内容。
[
   "names",
   "surname",
   {
      "relations":[
         {
            "relationType":[
            ]
         },
         {
            "person":[
               "names",
               "surname"
            ]
         }
      ]
   }
]
Source 方法中的 Context
让我们使用 @Source 向 Person 添加一个字段,看看 Context 能给我们带来什么。首先,我们将添加一个服务,该服务从 API(exchangeratesapi.io)获取汇率。这允许我们将该人员的汇率与某种货币进行关联。
在 Java 中,我们添加此 Source 方法:
public ExchangeRate getExchangeRate(@Source Person person, CurencyCode against){
    Map<CurencyCode, Double> map = exchangeRateService.getExchangeRates(against);
    Double rate = map.get(person.curencyCode);
    return new ExchangeRate(person.curencyCode, against, rate);
}现在我们可以查询该(ExchangeRate)字段了。
{
  person(id:1){
    names
    surname
    exchangeRate(against:GBP){
      rate
    }
  }
}
当我们在 ExchangeRateService 中 Inject 并打印 Context 时,我们现在得到:
executionId = 17333236733
request = {"query":"{\n  person(id:1){\n    names\n    surname\n    exchangeRate(against:GBP){\n      rate\n    }\n  }\n}","variables":null}
operationName = null
operationTypes = [Query]
parentTypeName = Person
variables = null
query = {
  person(id:1){
    names
    surname
    exchangeRate(against:GBP){
      rate
    }
  }
}
fieldName = exchangeRate
selectedFields = ["rate"]
source = com.github.phillipkruger.user.model.Person@7929ad0a
arguments = {against=GBP}
fieldName = exchangeRate
path = /person/exchangeRate
请注意,fieldName 现在是 exchangeRate,selectedFields 是 ["rate"]。您还会注意到 source 字段已填充了 person。
缓存
另一个经常出现的问题是如何缓存您的端点结果。举个例子,假设汇率信息可以每天更新,因此我们不希望每次调用都向 exchangeratesapi.io 发起调用。
您只需使用 Quarkus 随附的缓存!只需包含缓存扩展即可。
<dependency>
    <groupId>io.quarkus</groupId>
    <artifactId>quarkus-cache</artifactId>
</dependency>
并在您的方法上添加 @CacheResult 注解。
@CacheResult(cacheName = "exchange-rate-cache")
public ExchangeRate getExchangeRate(@Source Person person, CurencyCode against){
    Map<CurencyCode, Double> map = exchangeRateService.getExchangeRates(against);
    Double rate = map.get(person.curencyCode);
    return new ExchangeRate(person.curencyCode, against, rate);
}
在此处阅读有关 Quarkus 缓存的更多信息:quarkus.io/guides/cache
异步
现在,让我们添加另一个服务,该服务返回一个城市的天气状况。
@GraphQLApi
public class TravelEndpoint {

    @Inject
    WeatherService weatherService;

    @Query
    public Weather getWeather(String city){
        return weatherService.getWeather(city);
    }

}
假设这个人正在前往伦敦,您现在可以这样做:
{
  person(id:1){
    names
    surname
    exchangeRate(against:GBP){
      rate
    }
  }
  weather(city:"London"){
    description
    min
    max
  }
}
目前,person 和 weather 查询将按顺序执行,而且没有真正的原因应该是这样。我们可以在获取 person 的同时获取天气。
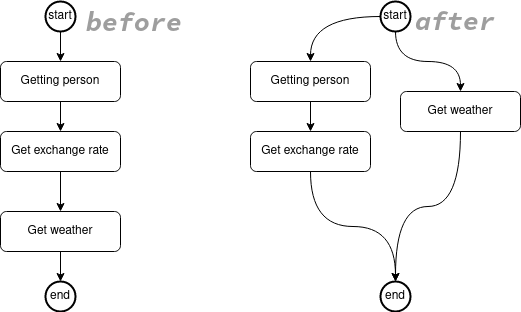
让我们更改 Java 代码。
@Query
public CompletableFuture<Person> getPerson(int id){
    return CompletableFuture.supplyAsync(() -> personService.getPerson(id));
}
和
@Query
public CompletableFuture<Weather> getWeather(String city){
    return weatherService.getWeather(city);
}
现在 person 和 weather 正在并发获取。
假设这个人实际上想去伦敦和纽约,我们可以这样做:
{
  person(id:1){
    names
    surname
    gbp:exchangeRate(against:GBP){
      rate
    }
    usd:exchangeRate(against:USD){
      rate
    }
  }
  uk:weather(city:"London"){
    description
    min
    max
  }
  us:weather(city:"New York"){
    description
    min
    max
  }
}
我们现在可以更改代码以并发获取汇率。
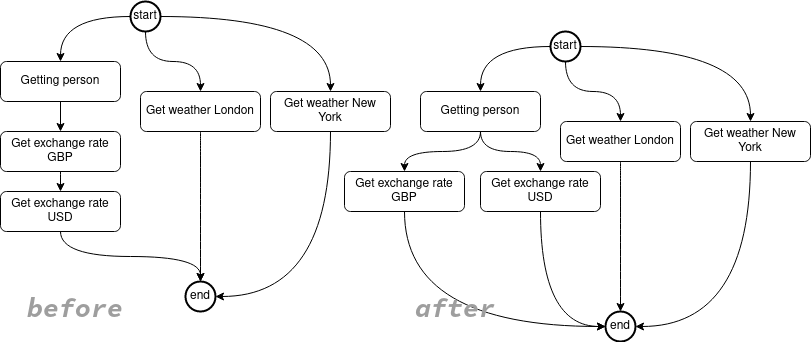
public CompletableFuture<ExchangeRate> getExchangeRate(@Source Person person, CurencyCode against){
    return CompletableFuture.supplyAsync(() -> exchangeRateService.getExchangeRate(against,person.curencyCode));
}
批量
如果您想获取所有 person,并且您包含了一个带有 Source 方法的字段(例如 exchangeRate),这意味着对于每个 person,我们都会调用 getExchangeRate 方法。根据 person 的数量,这可能会产生大量调用。因此,您可能更希望执行一个批量 source 方法。
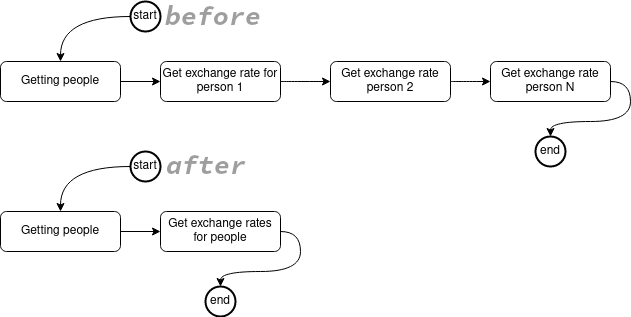
这将允许您在一个方法中获取所有 person,并进行一次调用来获取他们的汇率。
因此,让我们将 getExchangeRate 方法更改为接受 person 的 List 并返回 ExchangeRate 的 List。
public List<ExchangeRate> getExchangeRate(@Source List<Person> people, CurencyCode against){
    Map<CurencyCode, Double> map = exchangeRateService.getExchangeRates(against);

    List<ExchangeRate> rates = new ArrayList<>();
    for(Person person : people){
        Double rate = map.get(person.curencyCode);
        rates.add(new ExchangeRate(person.curencyCode, against, rate));
    }

    return rates;
}
上面的代码在只有一个 person 的 getPerson 方法上仍然有效。 |
查询所有 person。
{
  people{
    names
    surname
    exchangeRate(against:GBP){
      rate
    }
  }
}
这将调用所有 person 的 getExchangeRate 方法。
泛型
现在是 2050 年,我们需要扩展我们的旅行服务以也处理外星人。让我们添加一个泛型 Being 类型。
public class Being<T> {

    private T being;

    public Being() {
    }

    public Being(T being) {
        this.being = being;
    }

    public T getBeing() {
        return being;
    }

    public void setBeing(T being) {
        this.being = being;
    }
}
现在更改 Endpoint 以允许 people 和 alien 查询。
@Query
public Being<Person> getPerson(int id){
    return new Being<>(personService.getPerson(id));
}

@Query
public Being<Alien> getAlien(int id){
    return new Being<>(alienService.getAlien(id));
}
然后我们可以查询人类和外星生物。
{
  person(id:1){
    being{
      names
      surname
    }
  }
  alien(id:1){
    being{
      type
      from
    }
  }
}
事件和自定义执行
当您启用与 MicroProfile Metrics、MicroProfile OpenTracing 和 Bean Validation 的集成时,事件会在内部使用,但您也可以参与这些事件。这些都是 CDI 事件,可以使用 @Observes 注解。
在构建 Schema 时
当我们在类路径中扫描注解和类型时,我们会构建一个所有操作的模型。您可以通过参与创建操作事件来操作此模型。
public Operation createOperation(@Observes Operation operation) {
    // Here manipulate operation
    return operation;
}
在最终 Schema 构建之前,在扫描所有注解和上述事件之后,您可以参与并为 Schema 做出贡献:这会暴露底层的 graphql-java 实现细节,当您想做一些 SmallRye GraphQL 尚未实现的事情时,例如订阅,这可能会很有用。
public GraphQLSchema.Builder beforeSchemaBuild(@Observes GraphQLSchema.Builder builder) {
    // Here add you own, in example a subscription
    return builder;
}
在运行请求时
在此示例请求中:
{
  person(id:1){
    names
    surname
    exchangeRate(against:USD){
      rate
      base
    }
  }
}
请求流程如下:
-
Execution 服务获取请求。
-
Person 通过
datafetcher获取。 -
您的 CDI Bean(
@GraphQLApi)方法(getPerson)正在被调用。 -
汇率正在获取,并将上述 person 作为参数传递。
-
您的 CDI Bean(
@GraphQLApi)方法(getExchangeRate)正在被调用。 -
正在返回数据。
您可以在所有这些点上接收事件。
public void beforeExecute(@Observes @BeforeExecute Context context) {
    System.err.println(">>>>> Received beforeExecute event [" + context.getQuery() + "]");
}

public void beforeDataFetch(@Observes @BeforeDataFetch Context context) {
    System.err.println(">>>>> Received beforeDataFetch event [" + context.getQuery() + "]");
}

public void beforeInvoke(@Observes InvokeInfo invokeInfo) {
    System.err.println(">>>>> Received beforeInvoke event [" + invokeInfo.getOperationMethod().getName() + "]");
}

public void afterDataFetch(@Observes @AfterDataFetch Context context) {
    System.err.println(">>>>> Received afterDataFetch event [" + context.getQuery() + "]");
}

public void afterExecute(@Observes @AfterExecute Context context) {
    System.err.println(">>>>> Received afterExecute event [" + context.getQuery() + "]");
}
当发生错误时,您还可以收到事件。
public void errorExecute(@Observes @ErrorExecute ErrorInfo errorInfo) {
    System.err.println(">>>>> Received errorExecute event [" + errorInfo.getT() + "]");
}

public void errorDataFetch(@Observes @ErrorDataFetch ErrorInfo errorInfo) {
    System.err.println(">>>>> Received errorDataFetch event [" + errorInfo.getT() + "]");
}
直接使用 Execution 服务
默认假定的行为是通过 HTTP 与您的端点进行交互,但是您可以自己注入 ExecutionService 并执行请求。
例如,让我们在启动时执行一个获取所有 person 的名字的请求。
{
  people{
    names
  }
}
我们现在可以这样做:
@ApplicationScoped
public class StartupService {

    @Inject ExecutionService executionService;

    public void init(@Observes StartupEvent event){

        JsonObjectBuilder builder = Json.createObjectBuilder();
        builder.add("query", ALL_NAMES);
        JsonObject request = builder.build();
        JsonObject response = executionService.execute(request);

        System.err.println(">>>>> " + response);

    }

    private static final String ALL_NAMES = "{\n" +
                                            "people{\n" +
                                            "    names\n" +
                                            "  }\n" +
                                            "}";
}
转换和映射
默认情况下,日期和数字值可以使用JsonB 格式进行转换。
public class Person {
    public String name;

    @JsonbDateFormat("dd.MM.yyyy")
    private Date birthDate;

    @JsonbNumberFormat("#0.00")
    public BigDecimal salary;
}
MicroProfile GraphQL 规范将相关的 Java 类型映射到 GraphQL Scalar。您可以更改现有字段的映射,以映射到另一个 Scalar 类型,如下所示:
@ToScalar(Scalar.Int.class)
Long id; // This usually maps to BigInteger
在 GraphQL Schema 中,这现在将映射到 int。
您还可以添加一个 Object,该 Object 应转换为 Scalar 类型而不是复杂对象。例如,您可能有一个 Email Object,但不想在 GraphQL 中使用复杂类型,而是将其映射到 String。
为此,您的 Email POJO 需要实现 toString 方法,并具有一个接受 String 的构造函数,或者一个静态的 Email fromString(String s) 方法,或者一个 setValue(String value) 方法。
public class Email {
    private String value;

    public Email() {
    }

    public Email(String value) {
        this.value = value;
    }

    public String getValue() {
        return value;
    }

    public void setValue(String value) {
        this.value = value;
    }

    @Override
    public String toString() {
        return value;
    }
}
然后,您可以将其用作 Response 上的字段,并添加 @ToScalar 注解,即 person。
@ToScalar(Scalar.String.class)
Email email; // This usually maps to a complex object